Thursday, December 24, 2009

VMware’s Fault Tolerance or “FT”

What is FT?
Fault Tolerance is 2 VM’s running in tandem on different ESX Hosts. VMware calls this “VLockstep”. FT uses a special type of VMotion to create the other VM on another Host. The secondary VM is a shadow of the primary VM.

FT is available only in the following editions of VSphere ESX 4: Advanced, Enterprise and Enterprise Plus editions

What are FT Requirements and other things that you need to know?
Note: More requirements may be required than the list provided below. This is intended as a brief list of some important items and some gotcha’s it is not a complete list.

At least 2 ESX Hosts are needed for FT in a test environment. Preferably 3 Hosts or more are recommended for maximum redundancy in a production environment.

Hardware Virtualization Technology “VT” enabled at the BIOS level of the ESX Hosts

You must have specific processors that support VMware Lockstep “FT” technology

Requires identical processors from the Primary and on Secondary ESX hosts
The CPU clock speed must be within 400 MHz

VM’s cannot use more than one vCPU

FT currently does not integrate with vCPUs, VM Snapshots, Thin Provision LUN’s, RDM or Storage VMotion

Primary and Secondary ESX hosts must be running same version and build of ESX

VMware HA must be enabled on the ESX Cluster for FT

DRS is not required for “FT” however, you can certainly continue to run DRS as part for your ESX Cluster for the other VM’s without any issues. Therefore, FT can run with or without DRS running on the same ESX Cluster.

No more than 8 protected servers per ESX host are recommended. I would however, not run that many protected servers. I would run up to 4.

Make sure that you have enough resources available for a second VM such as processor and memory. The two VM’s will share the same diskspace.

The FT VM cannot be thin-provisioned it must be thick. If the VM is thin provisioned it must be converted to thick.

A dedicated GB NIC for FT Logging each ESX Host is required

Shared diskspace

VM Storage cannot be migrated

VCB is not supported at this time

SSL Certificates must be enabled and verified for each ESX Host

Dedicated GB Network

Dedicated NIC for FT Logging MKernel Port- However, it can be shared with VMotion and the Service Console in a test environment

Note: Once the Primary VM goes down VSphere will failover to the Secondary VM and automatically create another VM for Secondary purposes “Spawning” another VM on another ESX Host if another Host is available.

How to implement FT?
OK so before you go implementing FT.... You should read VMware's FT requirements. It is also a good idea to run a VMware Site Survey against your ESX Hosts and also run the CPU info utility in order to make sure that your Hosts can be utilized for FT.
http://www.vmware.com/download/shared_utilities.html

After you have thoroughly looked over the requirements and have evaluated whether you can run FT or not in your environment it is quite simple to implement.

First Test that VMotion is working and that you can VMotion VM’s between ESX Hosts in your Cluster

You must have HA Enabled on your ESX Cluster

Right-Click on VM and select Fault Tolerance. Note: The VM can be either powered up or powered down during this process. I have had more success with the VM being powered off.
The FT process will begin to build the second VM for FT on one of the other ESX Hosts in the Cluster. Depending on the size of the VM this can take a while. Be Patient!

The Primary VM has a different type of icon that signifies it is a VM running with a paired Lockstep VM


The (Secondary) VM is created however; you cannot see the VM running on the list of VM’s unless you list the Virtual Machines on the ESX Host that is housing the secondary VM
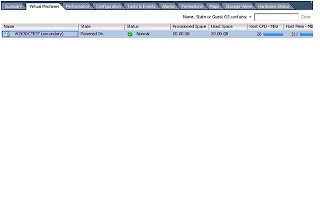


Some Potential Errors when enabling FT on a VM

SSL Host Certificates are not configured on the ESX Hosts
No FT Logging NIC’s are configured on the Hosts
The VM has snapshots, has multiple vCPU’s, has a CD-ROM connected

How to Test FT?

Verify that you see the same information on the Secondary VM by opening up the Console on the Primary and the Secondary VM

Shutdown the Host where the Primary VM resides and make sure that you can still access the Secondary VM while the Primary is shutting down

Test pings to the primary machine while it is being shutdown. Note: You should lose no more than 1 ping to the server at the time of failover to the Secondary VM.

When the other ESX host is powered back up the Secondary VM will power up again and you will have the pair working in vLockStep tandem again


How to Failover for FT?

Right Click on the Primary VM and select Test Failover from the Fault Tolerance Menu
These tests will Failover to the Secondary VM and then Failback to the Primary VM
Note: It is normal to lose 1 ping during the failover process

You can also Test restarting the Secondary VM
Right Click on the Primary VM and select Test Restart Secondary from the Fault Tolerance Menu

Sunday, November 29, 2009

With Windows 7 comes many new changes...

Windows 7 has many changes that affect the way you may have worked with XP and or Vista. Below is a small list of some the things I need and use on a daily basis that I had to add to W7.

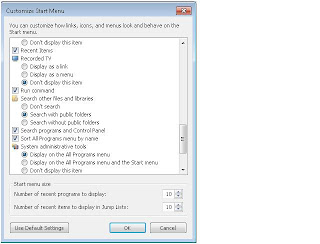
1. Where is the Run command?
Right Click on the Windows 7 Start Menu and click on Properties
Check mark the Run Command and hit Apply
2. Where is the Recent items?
Follow the steps for #1 above and check mark Recent Items
3. Where are the Admin Tools?
Follow the steps for #1 above and check mark
4. How to add Telnet? This is pretty much the same way as it is with Vista with a bit of a twist.
Go to Control Panel, then select Programs, then Select turn Windows Features On or Off, then check mark Telnet Client and then select OK.

WIndows 7 as a VM on ESX 3.5

When installing Windows 7 on ESX 3.5 you do not have a choice for your VM to install Windows 7

Use 2GB minimum RAM for the Windows 7 VM
Choose Windows Vista 64 bit as the operating system choice
Once you install the operating system make sure to install the VMTools and reboot. This will install the VMTools for Vista which works fine for Windows 7.

Saturday, November 21, 2009

Issues with Remote Web Workplace "RWW" and IE7

When you first access Remote Web Workplace "RWW"you will need to install an Active X component. Some browsers have an issue with RWW. The error that you may be prompted with is seen below. The issue is that after you install the component you shoudl be on your way. However that is not true.
"This portion of the Remote Web Workplace requires the MicrosoftRemote Desktop ActiveX Control. Your browser's security settings maybe preventing you from downloading ActiveX controls. Adjust thesesettings and try to connect again."

IE7 seems to install the Active X component but when you try to access RWW again you are again prompted that you need to install the component.
The fix after struggling for an hour is the follwoing:
Internet Options, Advanced Tab and click RESET, the problem goes away. This solves the problem of RWW access and IE7.

IE6 did not seem to have any issues, the component is added with no issues and you are on your way. I also have not tried IE8 or Firefox as of yet.
Another note: Safari canot be used with RWW since it requires an Active X component and that is for IE.

Also make sure that Port 4125 is open on your firewall and it is deirected to the SBS Server.

Monday, November 16, 2009

SMB and ESX on a not so low budget Part II (dos) continued...

SMB and ESX on a not so low budget Part II (dos) continued
As mentioned earlier in Part I. The scenario is an SMB customer, 10 old Dell physical servers that need to be retired and a small budget for upgrades. The challenges are to keep the costs down and still provide the same or better performance that was in place with the physical environment. Well …it has been 9 months since my customer has Phase I of their VMware environment in place. The other thing is we have an OK for some shared storage and we have a budget this time for a SAN and VMware!

New Requirements
In addition to the earlier challenges the customer would like high availability for the production environment. They are also adding a DR site and want the ability to recover the VM’s and data at the DR site. The customer has also added a couple of additional VM’s and may add more VM’s in the future. Therefore, the existing hardware has been upgraded a bit. They are also taking on a Symantec Enterprise Vault project for Email and File System archiving which requires additional storage.

Production Site Hardware and Software
Using the same 2- Dell 1950 III servers each upgraded to 24GB RAM, 6 NICS, 2 Intel Xeon 2Ghz Dual Core Procs and 2-250GB SATA drives configured as RAID1
Dedicated NIC’s for redundant iSCSI traffic
1 -EMC AX4-5I iSCSI SAN with SAS drives
Real-time Block-Level Replication of SAN data between the production and the DR sites
The 2 hosts are now running VMware VSphere ESX4 Essentials Plus bundle which includes High Availability “HA” which also lets us leverage the iSCSI SAN for storage of VM's. The bundle includes 3 hosts licenses and 1 license of VCenter.
Total 14 VM’s
2 Citrix XenApp Servers
2 Domain Controllers
1 WSUS Server
1 Application Server running a financial application hosted by the XenApp servers
1 MS SQL Database Server for Vault
2 Enterprise Vault Servers
1 Exchange OWA Server
1 Blackberry Enterprise Server
1 VCenter Server
1 Web Server
1 Websense Server on the “DMZ”
2 Gigabit Switches dedicated for redundant iSCSI traffic
The Iomega NAS StoreCenter ix2 was kept for ISO’s and other misc. data

DR Site Hardware and Software
3 Dell 2650’s for DR Hosts
ESX3i
EMC AX4-5I iSCSI SAN with SATA drives
1 Gigabit Switch

Backups
Since the customer utilizes Symantec Backup Exec for backups they purchased the VMware Infrastructure Agent for Backup Exec. The agent allows you to leverage VCB and backup live VM’s. The VM’s are replicated to the DR site and are backed up to a local NAS device at the production site.

How to download and purchase VMware VSphere ESX4 Essentials bundle
http://downloads.vmware.com/d/info/datacenter_downloads/vmware_vsphere_4/4
http://www.vmware.com/vmwarestore/smb-solutions-server.html

For more information on EMC Clarion AX4
http://www.emc.com/products/detail/hardware/clariion-ax4.htm

Comparison of the top 3 Server hypervisors

For a nice article comparing the top 3 Server hypervisors
VMware's ESX 3.5, Microsoft's Hyper-V and Citrix's XenServer
Dated: 3/02/2009
http://virtualizationreview.com/Articles/2009/03/02/Lab-Experiment-Hypervisors.aspx?Page=1

How to Remote Control a PC from a Mac

How to Remote Control a PC from a Mac
Download and Install on your Mac
http://www.microsoft.com/mac/products/remote-desktop/default.mspx

Once installed simply put in the name or the IP of the Windows machine and click connect

How to run Windows PC inside of a Mac

How to run Windows PC inside of a Mac - No need to use Apple's BootCamp and no need to reboot
Tested with Mac OSX version 10.5.8 and XP Professional SP3

VMware Fusion for the Mac. Download and install a 30 day eval http://downloads.vmware.com/d/info/desktop_downloads/vmware_fusion_for_the_mac/3_0
Make sure you install the VMware Tools after installing the OS

Also download and intsall a trial of Parallels Desktop for the Mac
http://www.parallels.com/products/desktop/

I have used both of these ppay for products in the past and present. They both work excellent!

I have not tried these free products yet however, they look very interesting...
Virtual Box 3.1.10
http://www.macupdate.com/info.php/id/24801
Q Emulator
http://www.macupdate.com/info.php/id/20830/q-emulator

How to Remote Control a Macintosh from a Windows PC

How to Remote Control a Macintosh from a Windows PC
Tested with Mac OS X version 10.5.8 and Windows Vista SP1. This should also work with XP.
From the Mac
1. Click on Apple icon on the top left of your screen and select System Preferences
2. Select Sharing
3. Click on the check box Remote Management
4. Click on the Computer Settings button
5. Check VNC viewers may control screen with password. Enter a password and note it.
6. Type in your Mac password in the Authentication dialog box that pops up on your screen. This will allow System Preferences to set the password for VNC users.
7. Note the IP address of the Mac
From the PC
8. Download and install TightVNC on your Windows PC. Only the TightVNC Viewer is necessary. http://www.tightvnc.com/download.html
9. Now Run TightVNC from your Windows PC
10. Enter the Mac IP Address that you noted earlier and select OK
11. Enter the VNC Mac’s password that you set up earlier
12. You should now see the Mac desktop
Done!

Tuesday, September 29, 2009

Vista- Where has my Telnet gone?

Vista does not enable the Telnet client by default. Follow these few steps below:

1. Click the Start
2. Click Settings and then Control Panel
3. Select Programs and Features
4. Select Turn Windows Features on or off (located on the left side of the window)
5. Confrim and wait for the list to appear
6. Click the checkbox next to Telnet client then wait
7. Click OK
Done!

Monday, June 15, 2009

SMB and ESX3i with a very low budget Part I (uno)

9 months ago…
An SMB customer with 10 old Dell physcial servers that needed to be retired and a very, very , very tight budget for upgrades. The challenges were to keep the costs down and still provide the same or better performance that we had with the physical environment. No budget for Virtulaization software software, no budget for a SAN, no budget for fancy storage, and no budget for backup software, etc. I had utilized ESX3i in the past for SMB's, for DR purposes and for lab testing in the past. I decided to do some more thorough testing in my lab and found out what I could get away with using ESX3i as a host and as a potential production solution.
Enter VMware and some some ingenuity

Testing Environment
1 Dell 1950 III and 1 HP DL360 G2 each with 8GB of RAM, 2 NIC's and 128GB of local storage
VMware ESX3i
1 Iomega NAS 500GB
Modified Ghettovcb.sh
Gigabit switch
VMware's P2V

Testing and Findings
After I was satisfied with my testing I introduced 2 new economical Dell rack servers, VMware ESX3i and an Iomega NAS for backups. I P2V each physical machine to the ESX3i hosts. I sized each host server to house 5 VM's each. However, if one of the hosts failed I would have the other host capable of taking over and run all 10 VM's. Since ESXi does not support HA and the VM are local to the datastores I also had to come up with a backup and restore/recovery plan for my VM's.
I found that the VM's perform better on the local data stores than on the NAS. Therefroe, I would keep the running VM's on each local data store and use the NAS as a backup and as a recovery device.

Local datastores for the VM's- 5 VM's per Host
NAS for VM backups and ISO's, etc.

Backups
I also had to worry about backups and what if I lose a host or a VM. What then, how do I restore or recover the VM’s with no backup software and no shared sotrage? I found a backup script called ghettovcb.sh and modified it for my VM backups. I used the Iomega NAS to hold my VM backups. What I also came up with was that my backups could be used for a recovery. Since the VM backups were already on NAS presented to both ESXi hosts as an NFS volume. I could easily just add the *.vmx file back to the inventory of the running ESXi host and fire up the VM.

The VM backups to the NAS run slow and the VM’s perform better on local data store. I could also restore the VM to the ESXi local data store if we have the time or the performance is to slow when the VM’s are running from the NAS .

Production Hardware
2- Dell 1950 III servers each with 16GB RAM, 4 NICS, 2 Intel Xeon 2Ghz Dual Core Procs and 2 250GB SATA drives configured as RAID1
ESX3i
1- Iomega StorCeneter iX2 Network Storage NAS Server 1TB raw or 500GB RAID1
1 Gigabit Switch
P2V

Production Recomendations
Run the VM's from ESX host local datastores for better performance
Use the NAS for VM backups and for recovery

Where to get ghettovcb.sh script http://communities.vmware.com/docs/DOC-8760

Where to get VMware’s ESX3i
http://downloads.vmware.com/d/info/datacenter_downloads/vmware_esxi/3_5
Note: I have not done any testing with ESX4i

Iomega NAS example on where to buy
http://www.cdw.com/shop/products/default.aspx?EDC=1591013

Once the customer can get some budget dollars we can get a better solution in place however, we will still be looking to keep the costs down to a minimum wherever we can. Part II (dos) to follow soon…

Saturday, June 13, 2009

Adding an NFS datastore to ESX 3.5 using an EMC Iomega StorCenter iX2

1. Attach to the Iomega NAS device
2. Select Configure
3. Set the Device Name -For example: NASSTORE
3. Set the password:
4. Set email notification: xxx@xxxx.com
5. Set the Timezone
6. Restart the device

7. Change the IP from DHCP to a Dedicated IP Adrress: 192.168.xx.xx
8. Restart the device

9. Setup NFS under Settings then choose NFS
10. Enable NFS Service

11. Setup Shares
12. Create the Share with No Security
13. Share Name- For Example: NASSHARE

14. Open the VI3 Client and setup Networking
15. Select the Configuration tab and then Select Networking
15. Create an iSCSI Console on an existing vSwitch and assign an IP to it or create a new vSwitch 16. Add a NIC to the vSwitch

This assumes you already have iSCSI configured
17. Select Storage Adapters in the Configuration tab
18. Select the iSCSI Software Adapter
19. Click on Properties
20. Select Dynamic Discovery tab
21. Add the IP address of the NAS device

Add Storage
22. Add Storage with the VI client under the Configuration then Storage Tab
23. Choose NFS then Next
24. Server is the IP or name of the NAS device
25. Folder is the Full Path of NFS Export: /nfs/NASSHARE
26. Datastore Name is the friendly name of the ESX datastore to be created
27. Then choose Next

You should now see the new NASVMFS datasore in the Storage tab of your ESX server. You can now begin to use the NFS datastore.

Monday, June 1, 2009

How to start a VM from command line in 2 steps

This command will list the VM's that are located on an ESX server datastore whether they are running VM's or not. Copy the path so that you can later paste it in to your next command in step 2.
1. vmware-cmd -l

This command will start the VM in the path below. Paste the path of the VM
Example:
2. vmware-cmd /vmfs/volumes/493d215c-54090920-3855-02219516464/PHMEX2K7HTCAS/PHMEX2K7HTCAS.vmx start

Wednesday, May 27, 2009

What to do if you can't boot to a CD to create a VM

I could not get the newly created VM to boot to a CD from the host ESX server. Believe me I checked all of the obvious reasons first, like is the CD was not connected, boot options, etc.

The fix below is not a new technique and I know that this topic has been written about many times before this posting. I simply look to document things in chronological order and condense the steps without writing a long winded explanation that turns into a short novel.

6 Quick steps I used for a stubborn VM not booting to a CD
1. I created an ISO image file from the Winidows 2003 CD with Roxio on my laptop
2. I then copied the ISO file from my latop to a new folder on the ESX datastore. I used Winscp to do the copy.
3. Then I powered on my new Windows 2003 Server VM install. I pointed the CD to the ISO file I had copied above.
4. I then downloaded the VMware SCSI Disk Driver file "vmscsi-1.2.0.4.flp"
5. I hit F6 during the Windows install so that I could loed the poper MAS storage device driver
6. When prompted for a storage device driver I then pointed it to the "vmscsi-1.2.0.4.flp" file
Done!

I was now on my way and I could continue with my install and worry about the reasons why I could not boot to the CD in the first place at a later time.

Downloads
VMware SCSI Driver http://www.vmware.com/download/ws/drivers_tools.html
WinSCP http://winscp.net/eng/download.php

Tuesday, April 21, 2009

How to create a GPO to Disable the Windows Firewall on XP

Run Regedit

Computer Configuration
Administrative Templates
Network
Network Connections
Windows Firewall
Select the Domain Profile
Windows Firewall: Protect all network connections
Disable this setting

Also don’t forget to apply the policy to the object
Under the Properties and Security of the of the GPO

Monday, April 20, 2009

How to clear the Print Spooler

Net stop spooler
cd \windows\system32\spool\printers
del *.* /y
Net start spooler

Thursday, April 16, 2009

How to re-create the Citrix local cache if it has become corrupted

Batch File to Stop the Citrix IMA services, re-create the local cache on a Citrix XenApp server and then restart to the Citrix Services

@echo off
echo.
.echo...Stopping the Citrix IMA Services services...
net stop "Citrix SMA Service" > NUL
net stop Citrixwmiservice > NUL
net stop imaservice > NUL
echo. Running dsmaint and re-creating the Local Cache
dsmaint recreatelhc

echo... Starting the Citrix IMA Services services...
net start imaservice > NUL
net start "Citrix SMA Service" > NUL
net start citrixwmiservice > NUL

EXIT

Wednesday, April 15, 2009

What happened to my Mail icon in Control Panel?

Some of you may be looking for your familiar email icon that you were accustomed to seeing with Windows XP. Well... if you are using Windows Vista 64 bit it's gone but not totally gone.

Go to Control Panel
Click on View 32-bit Control Panel Items
You will then see your 32 bit email icon

Thursday, April 9, 2009

Windows XP Profile Migration

XP Profile Migration

Note: This process below can also be used when a user joins a new Domain although some additional steps will be required.

Old User Account

1. Login as Administrator
2. Open the registry - REGEDIT
3. Go to this key: HKLM\SOFTWARE\Microsoft\Windows NT\CurrentVersion\Profilelist
4. Note the key whose value for ProfileImagePath corresponds to the location of the profile for the old user account.
5. Note the profile folders within the folder C:\Documents and Settings.

New User Account

6. Logon to the computer with the new user account which creates the new profile
7. Reboot note: you can logout but I like the reboot
8. Login as Administrator
9. Note the name of the new profile folder within C:\Documents and Settings.
10. Logon as the Local administrator
11. Make the new User a local administrator
12. Go to this key: HKLM\SOFTWARE\Microsoft\Windows NT\CurrentVersion\Profilelist
13. Note the key whose value for ProfileImagePath corresponds to the location of the profile for the new user account.
14. Replace the value of ProfileImagePath from Step 9 with the value of ProfileImagePath from Step 3. The value is case sensitive so do a copy and paste
15. Delete the key from Step 3.
16. Delete the newly created profile folder or rename to be safe
17. Set the permissions on the profile folder to local adminstrators: Full Control, user account: Full Control, and System: Full Control and propagate the permissions through all subfolders and files.
18. Logon to the computer as the new user

Cleanup
19. Remove the user from the Local Administrators group
20. Delete the old profile folder

Reference: I cannot remember where I got this information so I made some notes when I first used this about 5 years ago. I recently had to do this again could not find my notes so I did it by memory. This time I documented the process so enjoy!

Sunday, April 5, 2009

Lost or forgotten ESX Server root Password

Lost or Forgotten ESX Server root Password

1. Shutdown and Reboot your VMware ESX Server
2. Once you see the GRUB boot screen - Select Service Console Only (troubleshooting mode) then press a
3. Type in single and press Enter
4. At the at the sh-2.05b# prompt type in passwd command
Note: You must enter the new root password twice
5. Reboot the ESX Server as you normally would.
6. Verify the new password by logging in at the console

How to Change the root Password
Use putty to connect to the ESX server console with root and your current password
Change the root password by typing in passwd at the console

Tuesday, March 31, 2009

VMware SVMotion plug-in

This SVMotion tool is a VI plug-in that allows you to perform Storage VMotion from a GUI instead of how it is normaly done via the command line. Use this link to download it and to learn more about this awesome tool.

http://vip-svmotion.wiki.sourceforge.net/

Monday, March 30, 2009

How to enable ssh on ESXi

SSH is available on ESXi . Enabling SSH on ESXi differs from how to enable it for ESX. You must run some commands in order to get it enabled . Note: SSH is disabled by default on ESXi server as it is on ESX.

For ESXi
1. At the console of the ESXi host, press ALT-F1 to access the console window
2. Type unsupported in the console and then press Enter. Note: You will not see the text you that you are typing that is OK go ahead and proceed.
3. You will now see the Tech Support Mode warning and a password prompt. Enter the password for the root login
4. You will now see the prompt of ~ #
5. Edit the file inetd.conf Type in the command vi /etc/inetd.conf
6. Find the line in the file that begins with #ssh and remove the # Then save the file and close the the vi editor
I am assuming you know how to use vi if not then refer to the links below for more details.
7. Run the command /sbin/services.sh restart to restart the management services.

You'll now be able to connect to the ESXi host with a SSH client such as WinSCP3 or ssh client, Putty, etc.

The article that I used as a reference:
http://www.vm-help.com/esx/esx3i/ESXi_enable_SSH.php
If you need help with vi commands: http://www.cs.rit.edu/~cslab/vi.html#A1.15

Sunday, March 29, 2009

Why I started this blog?

This blog is dedicated to providing information of my experiences with VMware, Windows, Exchange Server, Citrix and some of my personal interests.

I was inspired to start this blog by one of my clients. We had just upgraded our ESX servers from 3.5 update 1 to update 3. We discovered that when upgrading the VM Tools on the VM’s the upgrade does not hold your settings from the prior install. Since we run ovrer 50 XenAPP Server VM’s on ESX 3.5 hosts we had actually created a problem by upgrading our VMTools. The value hgfs is added to the VM when you enable VMware shared folders, choose the complete install or when you re-install the VMware Tools. This creates a problem with Roaming Profiles when the WTS/XenAPP VM’s are running as VM's on ESX hosts. Since we have over 50 servers my customer asked me to write something to fix this. Therefore, I wrote a quick batch file and a registry file change to address the issue. We implemented a copy of the 2 files on a test server and then executed the process with User Manager Pro. Since we reboot the XenAPP servers nightly we covered all the bases and we were able to fix the issue quickly and before it got worse.

Although I had been told earlier by many of my colleagues and friends to do some writing, share some of my experiences and knowledge I never did it. I thought that maybe others could benefit from this information in the future so this time I did something about it! So I started this blog. I will continue to post information as acurately as I can and I will continue to try to improve on my posts, my writing and my information. I hope some of my posts help you in the future. Keep checking in!

Thanks,
Percy

Saturday, March 28, 2009

Cannot locate Linux VM when running VCB backups

VCB framework error: Cannot locate Linux VM via IP Address or via FQDN name when using VCB

Use the VC Display Name only of the Linux VM’s. The IP address or FQDN does not seem to work

Use IP address or FQDN or the VC Display Name for Windows VM’s

Windows Guest Cannot Update hgfs.dat

Roaming Profiles issues with Windows Terminal Server/Citrix XenApp Server as a VM on VMware ESX Servers. See VMware knowledege base related article http://kb.vmware.com/selfservice/microsites/search.do?language=en_US&cmd=displayKC&externalId=1317

The value hgfs gets installed when you enable VMware shared folders or when you re-install the VMware Tools.
HKEY_LOCAL_MACHINE\SYSTEM\CurrentControlSet\Control\NetworkProvider\Order\
ProviderOrder= hgfs,CdmService,RDPNP,LanmanWorkstation,WebClient

I created a batch file and a registry file to change the changes.
The new value will be as follows:
ProviderOrder= CdmService,RDPNP,LanmanWorkstation,WebClient

OK so here is the batch file and the registry file to remedy this issue
Call the batch file something like hgfsremove.bat
regedit /s M:\hgfsremove.reg
The /s switch is optional. The /s switch means it will make the registry change silently without notification. This is not necessary in this case but I thought I would add it in anyway.

You can call the registry file something like hgfsremove.reg
REGEDIT4[HKEY_LOCAL_MACHINE\System\CurrentControlSet\Control\NetworkProvider\Order]
"ProviderOrder"="CdmService,RDPNP,LanmanWorkstation,WebClient"

As you can see above the hgfs value gets delete from the ProviderOrder key. The registry file I provided will remove the hgfs from the key.

How to distribute these files to your WTS/XenAPP servers and how to run them? Well.. their is is many choices how to do this so I leave that up to you as long as it runs on each of your servers you will be in good shape. We copied the files and ran the process to all of the servers by using User Manager Pro http://www.liebsoft.com/User_Manager_Pro/. We rebooted the servers to cover the bases.

That's it problem fixed- enjoy!